.png)
How To Build A (Walipini)Underground Greenhouse-πως να χτισεις ενα υπογειο θερμοκηπιο
-
 7:21 μ.μ.
-
 0
comments
0
comments
 7:21 μ.μ.

Pit Greenhouses
Depending on latitude, but despite above ground air temperatures (and wind chill), 6 to 8 feet down into the earth, temperatures remain fairly constant, between 50 and 60°F. Meaning your pit greenhouse will be much warmer than an above ground greenhouse in winter and that cool earth will keep temps bearable in the summer.

Pit greenhouse in Spetchley Gardens, UK. Stairs down to entrance on right. Image byMezzapod.

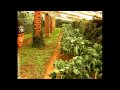
Underground greenhouse. The inside can be cased in stone, mud brick or any dense natural material able to absorb large amounts of heat. Cool weather crops like lettuce, kale and brocolli can be grown during winter in harsh climates. The glazing creates a “greenhouse effect.” If your water table is high, obviously that could spell disaster. It is recommended you build your greenhouse at least five feet above the water table. growtest.org

Mike Oehler’s pit greenhouse design. Mike digs a deep trench for access on the shaded south side which also allows cold air to sink and be warmed by the deeper, warmer soil. Many install tubes within the soil to transfer warmed air into the earth, yet Mike believes you need only the cold sink to allow the transfer in most climates. How to: motherearthnews.com. Mike Oehler’s book: www.undergroundhousing.com

Called a walipini in South America (from the Aymara Indian language, meaning "place of warmth"). As you dig, save your upper most topsoil (for the new bottom) and use the deeper soil as the new berm on the north side (or south side if you're south of the equator). Angling your window 90 degrees to the sun on the winter solstice will allow the pit to store the most heat during those days when the sun shines the fewest hours. Benson Institute Building a Walipini: www.bensoninstitute.org

Earthbag pit greenhouse. During the day, the earth walls store heat, the walls are the battery that release their heat at night. A properly designed pit greenhouse is naturally warmed at night from five sides, in an above ground greenhouse, only one side, the floor is heated during the day. A waterproof barrier extending along the periphery and down the berms are necessary www.naturalbuildingblog.com

Sun pit greenhouse. Illustration from the Owner-Built Homestead by Barbara and Ken Kern. amazon.com
Here is a large walipini in LaPaz, Bolivia. At two minutes they go inside the walipini, at four minutes they walk around the outside. In Spanish. Obviously they do not get much rain there. Organic Farm in Upper de la Paz, Bolivia.

Pit greenhouse made of local stone in Nepal at almost 10,000 feet altitude, where the temperature falls below freezing 199 days per year. Inside lush vegetation: www.rids-nepal.org

This pit greenhouse in Mongolia is currently producing food during three seasons of the year. As the footprints show the entrance is on the opposite side. thegreenbackpack.blogspot.com

Inside of above pit greenhouse. In a cold climate, the north, east and west walls should be well insulated. The north ceiling should be well insulated as well. thegreenbackpack.blogspot.com

Greenhouse built into a hill in Tennesee. Lots more pictures here: www.wind-sun.com

This pit greenhouse is in Texas, it is essentially a hole dug into the ground. Here the soil was such hard sandstone, minimal wall support was necesary. How to here: taroandti.com

Earth sheltered greenhouse with earthbag walls in Patagonia. Note the use of plastic around the periphery: ourlittlething.ning.com

One might need to dig a shallow drainage ditch around the perimeter of the greenhouse which will lead the run off water away from the structure. darfieldearthship.com

Pit greenhouse. Oft times barrels of rainwater will be stored at the back of a greenhouse to soak up and store even more heat. Note the entrance way to right. Lots more photos: greenhouseglimpses.blogspot.com

Walipini is another name for a pit greenhouse, this one is topped with old windows. More photos: onepinkhippie.com

Pit greenhouse in New Mexico dug by hand! Step by step photos: coatinativesnursery.com

Mud brick walipini in Ladakh which produces food year round in a very harsh climate. More photos: ashdenawards.blogspot.com

Care must be taken waterproofing, draining and ventilating the greenhouse. The most efficient pit greenhouses face the windows south and use the north wall to store heat.

This amazing couple bought a house with an old gunite pool and turned it into a 'closed-loop food-producing urban greenhouse.' Supporting tilapia, chickens and hydroponic vegetables and fruits. Watch video here: gardenpool.org

Earthen walled pit greenhouse. Lots of natural clay to absorb heat. The two most important factors in a pit greenhouse are the large amount of thermal mass (stone, soil, water), and its positioning toward the sun. www.organica.net.pl

An easy way to warm up and bring light into your basement. Build a mini-pit greenhouse on the south side of your home. naturalbuildingblog.com

A pit greenhouse used as dining area. www.solarinnovations.com

A pit greenhouse for musicians. www.imrevolting.net

At the New AIchemy Institue bioshelter, fish tanks and compost heat the greenhouse and adjoining house. Water is dense and holds heat even better than rock, soil takes third place in heat storage. The solar aquaculture ponds are above-ground, translucent tanks. The fertile pond water was used for irrigating crops. community.theaquaponicsource.com

Driftless Farm Greenhouse by Roald Gundersen, Wisconsin. The larger you build your pit greenhouse the more efficient, as the temperatures inside of a small greenhouse can fluctuate quite quickly. Read more about the project: www.mwt.net

Driftless Farm Greenhouse, Wisconsin. A 2800 s.f. straw-bale insulated solar greenhouse. Whole tee supports made from site-harvested black locust, which is a fast growing and extremely strong and rot-resistant, and abundant throughout Wisconsin. wholetrees.com

Earth Sheltered greenhouse by Hiroshi Iguchi, Japan. A greenhouse that obviously does not completely close. www.fifthworld-inc.com

Greenhouse by Rob Stout, New Mexico. www.swsolardesign.com

Pit greenhouse attached to a home. www.solarinnovations.com

Semi-underground greenhouse surrounded on two sides with a stone wall and earth behind. www.solarinnovations.com

Greenhouse built into a hill. www.solarinnovations.com

Pit greenhouses attached to stone buildings are also extremely energy efficient! See inside here: www.solarinnovations.com

Straw bales are a great insulator (an R-value of 1.5 to 3 per inch). Manure below ground will also help to keep these plants warm. Photo by Terrie Schweitzer, www.flickr.com

Cold frame of old windows and straw bales. Placing manure or compost down below the layer of topsoil will help keep the area warm. indianapublicmedia.org
How To:
Depending on latitude, but despite above ground air temperatures (and wind chill), 6 to 8 feet down into the earth, temperatures remain fairly constant, between 50 and 60°F. Meaning your pit greenhouse will be much warmer than an above ground greenhouse in winter and that cool earth will keep temps bearable in the summer.
Pit greenhouse in Spetchley Gardens, UK. Stairs down to entrance on right. Image byMezzapod.
Underground greenhouse. The inside can be cased in stone, mud brick or any dense natural material able to absorb large amounts of heat. Cool weather crops like lettuce, kale and brocolli can be grown during winter in harsh climates. The glazing creates a “greenhouse effect.” If your water table is high, obviously that could spell disaster. It is recommended you build your greenhouse at least five feet above the water table. growtest.org
Mike Oehler’s pit greenhouse design. Mike digs a deep trench for access on the shaded south side which also allows cold air to sink and be warmed by the deeper, warmer soil. Many install tubes within the soil to transfer warmed air into the earth, yet Mike believes you need only the cold sink to allow the transfer in most climates. How to: motherearthnews.com. Mike Oehler’s book: www.undergroundhousing.com
Called a walipini in South America (from the Aymara Indian language, meaning "place of warmth"). As you dig, save your upper most topsoil (for the new bottom) and use the deeper soil as the new berm on the north side (or south side if you're south of the equator). Angling your window 90 degrees to the sun on the winter solstice will allow the pit to store the most heat during those days when the sun shines the fewest hours. Benson Institute Building a Walipini: www.bensoninstitute.org
Earthbag pit greenhouse. During the day, the earth walls store heat, the walls are the battery that release their heat at night. A properly designed pit greenhouse is naturally warmed at night from five sides, in an above ground greenhouse, only one side, the floor is heated during the day. A waterproof barrier extending along the periphery and down the berms are necessary www.naturalbuildingblog.com
Sun pit greenhouse. Illustration from the Owner-Built Homestead by Barbara and Ken Kern. amazon.com
Here is a large walipini in LaPaz, Bolivia. At two minutes they go inside the walipini, at four minutes they walk around the outside. In Spanish. Obviously they do not get much rain there. Organic Farm in Upper de la Paz, Bolivia.
Pit greenhouse made of local stone in Nepal at almost 10,000 feet altitude, where the temperature falls below freezing 199 days per year. Inside lush vegetation: www.rids-nepal.org
This pit greenhouse in Mongolia is currently producing food during three seasons of the year. As the footprints show the entrance is on the opposite side. thegreenbackpack.blogspot.com
Inside of above pit greenhouse. In a cold climate, the north, east and west walls should be well insulated. The north ceiling should be well insulated as well. thegreenbackpack.blogspot.com
Greenhouse built into a hill in Tennesee. Lots more pictures here: www.wind-sun.com
This pit greenhouse is in Texas, it is essentially a hole dug into the ground. Here the soil was such hard sandstone, minimal wall support was necesary. How to here: taroandti.com
Earth sheltered greenhouse with earthbag walls in Patagonia. Note the use of plastic around the periphery: ourlittlething.ning.com
One might need to dig a shallow drainage ditch around the perimeter of the greenhouse which will lead the run off water away from the structure. darfieldearthship.com
Pit greenhouse. Oft times barrels of rainwater will be stored at the back of a greenhouse to soak up and store even more heat. Note the entrance way to right. Lots more photos: greenhouseglimpses.blogspot.com
Walipini is another name for a pit greenhouse, this one is topped with old windows. More photos: onepinkhippie.com
Pit greenhouse in New Mexico dug by hand! Step by step photos: coatinativesnursery.com
Mud brick walipini in Ladakh which produces food year round in a very harsh climate. More photos: ashdenawards.blogspot.com
Care must be taken waterproofing, draining and ventilating the greenhouse. The most efficient pit greenhouses face the windows south and use the north wall to store heat.
This amazing couple bought a house with an old gunite pool and turned it into a 'closed-loop food-producing urban greenhouse.' Supporting tilapia, chickens and hydroponic vegetables and fruits. Watch video here: gardenpool.org
Earthen walled pit greenhouse. Lots of natural clay to absorb heat. The two most important factors in a pit greenhouse are the large amount of thermal mass (stone, soil, water), and its positioning toward the sun. www.organica.net.pl
An easy way to warm up and bring light into your basement. Build a mini-pit greenhouse on the south side of your home. naturalbuildingblog.com
A pit greenhouse used as dining area. www.solarinnovations.com
A pit greenhouse for musicians. www.imrevolting.net
At the New AIchemy Institue bioshelter, fish tanks and compost heat the greenhouse and adjoining house. Water is dense and holds heat even better than rock, soil takes third place in heat storage. The solar aquaculture ponds are above-ground, translucent tanks. The fertile pond water was used for irrigating crops. community.theaquaponicsource.com
Driftless Farm Greenhouse by Roald Gundersen, Wisconsin. The larger you build your pit greenhouse the more efficient, as the temperatures inside of a small greenhouse can fluctuate quite quickly. Read more about the project: www.mwt.net
Driftless Farm Greenhouse, Wisconsin. A 2800 s.f. straw-bale insulated solar greenhouse. Whole tee supports made from site-harvested black locust, which is a fast growing and extremely strong and rot-resistant, and abundant throughout Wisconsin. wholetrees.com
Earth Sheltered greenhouse by Hiroshi Iguchi, Japan. A greenhouse that obviously does not completely close. www.fifthworld-inc.com
Greenhouse by Rob Stout, New Mexico. www.swsolardesign.com
Pit greenhouse attached to a home. www.solarinnovations.com
Semi-underground greenhouse surrounded on two sides with a stone wall and earth behind. www.solarinnovations.com
Greenhouse built into a hill. www.solarinnovations.com
Pit greenhouses attached to stone buildings are also extremely energy efficient! See inside here: www.solarinnovations.com
Straw bales are a great insulator (an R-value of 1.5 to 3 per inch). Manure below ground will also help to keep these plants warm. Photo by Terrie Schweitzer, www.flickr.com
Cold frame of old windows and straw bales. Placing manure or compost down below the layer of topsoil will help keep the area warm. indianapublicmedia.org
How To:
Great step by step Earth Sheltered Greenhouse with center work space/cold sink. Lots of pictures: geektrap.com
Benson Institute Building a Walipini: www.bensoninstitute.org
YMCA Solar Greenhouse in Virginia, partially submerged: www.solaripedia.com & www.roperld.com
Earth Sheltered Greenhouse by Mike Oehler: motherearthnews.com
Mud brick walipini: ashdenawards.blogspot.com
Mud Heat Storage Greenhouse by Joseph Orr: motherearthnews.com
Step by step, cinder block: greenhouseglimpses.blogspot.com
A bermed, solar heated greenhouse in Idaho: www.builditsolar.com
Small bermed earth sheltered greenhouse: thehomesteadingboards.com
A quonset hut type greenhouse from chain link fence top railings: frugal-living-freedom.com
Compost Heated Greenhouses: attra.ncat.org
Solviva Greenhouse: www.solviva.com
Books:
The Earth-Sheltered Solar Greenhouse Book by Mike Oehler: undergroundhousing.com
The Solar Greenhouse Book by James McCullagh and printed by Rodale press
Gardener's Solar Greenhouse from the book by Ray Wolf, published by Rodale Press
How to Grow $500,000 on One Acre by Anna Eddy. www.solviva.com
Solar Greenhouses: Underground Daniel Geery. 1982. TAB Books, Inc.
More:
Slope, orientation, glazing, etc: attra.ncat.org
Lots of info! L. David Roper: www.roperld.com
Compost heated greenhouses: attra.ncat.org
Wood greenhouse kits, they will make a kit for your foundation: cedarbuilt.homestead.com
Solar Greenhouse Links: www.builditsolar.com
Video:
Greenhouse with air heated subfloor: www.youtube.com


